Frequently Asked Questions
What could be the cause of a Clipper® Wire Hook splice failure?
The Clipper® Wire Hook System is a very reliable splicing system. There are instances, though, when the splice is not performing to your expectations. Below is a list of problems that might occur and some typical solutions, listed in order of probable occurrence.
Potential Problems
- Failed Splice - Hooks open up and release from the belt end (Fig. 1).
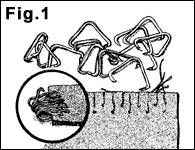
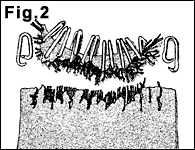
See solutions 1, 2, 9, 7, 16 - Failed Splice - Hooks pull through the end of the belt without opening, remaining fully clinched (Fig. 2).
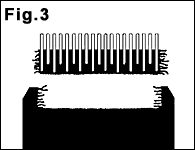
See solutions 4, 5, 7, 1, 6 - Belt fractures directly behind fasteners (Fig. 3).
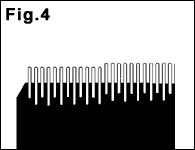
See solutions 6, 5, 1 - Steps in lacing (Fig. 4).
See solutions 12, 7, 8 - Hooks rust or corrode.
See solution 10 - Connecting pin fractures prematurely.
See solutions 11, 16, 13 - Connecting pin wears out prematurely.
See solution 13 - Difficulty inserting the connecting pin into the finished splice.
See solutions 13, 15, 21, 3 - Connecting pin migrates out of the splice.
See solutions 7, 16, 13, 22 - Hook legs fracture prematurely.
See solutions 6, 8 - A flat area is worn on the hook legs prematurely.
See solutions 9, 10 - Hooks wear out in the loop area prematurely.
See solution 13 - Hook loops lean together in pairs (Fig. 5).
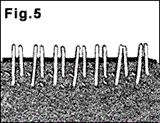
See solutions 9, 23 - Hooks twist.
See solution 8, 14 - Splice trips magnetic dectector.
See solution 17 - Splice trips metallic detector.
See solution 18 - Hook points twist (lay over) instead of properly penetrating the belt.
See solutions 19, 14 - End hooks pull out or fall out of the belt.
See solutions 20, 9, 2, 24 - Belt wave/rippling (Fig. 6).
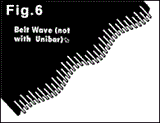
See solution 21
Solutions
- Wrong hook size. Reference the hook selection chart or call your local distributor to determine the correct size.
- Tension load too high for the strength of the hooks. Check if belt is being subjected to severe load tension on startup or at periodic intervals. Consider using hooks made of high tensile wire or a hook made from a larger diameter wire for added strength.
- Hooks improperly installed.
- Hooks not reaching back far enough into belt carcass to withstand tension load. Use hook with longer leg to reach back farther into belt to grab more fill yarns. (Caution: Do not use hook too big for recommended minimum pulley diameter. Reference the hook selection chart.)
- Belt may not be correct for the application. Check with your local distributor or belt manufacturer.
- Hook exceeds recommended minimum pulley diameter. Reference the hook selection chart or call your local distributor to ensure correct hook size.
- Belt not cut square before lacing.
- Hooks over-compressed when installed.
- Hooks under-compressed when installed.
- Wrong hook material selected for the application. Clipper hooks are available in a number of metals to fit your application needs.
- Connecting pin is too rigid for the application. Troughing applications or crowned pulleys must use a flexible pin such as Nylon Covered Stainless Cable, Duralink™ or Nylon Plus.
- Refer to owner's manual for the lacer to review proper continuous lacing steps.
- Wrong connecting pin used. Use proper connecting pin for hook size and application. (Avoid using welding rod, baling wire and other makeshift connecting pins).
- Hook point too long for belt thickness. Refer to the hook selection chart or call your local distributor to ensure correct hook size.
- Connecting pin not rigid enough to insert into wide splice. Use a Clipper swaged leader assembly for easy insertion of flexible pins or switch to a rigid pin.
- Conveyor is out of alignment causing belt to mistrack. Diagnose and correct.
- Currently using hooks with magnetic properties. Switch to Bronze, Hastelloy of Inconel hooks. 316 Stainless Steel is only slightly magnetic and rarely trips detectors. Remember to use non-magnetic connecting pins also.
- Using metallic hooks. Consider switching to either the Alligator® Spiral or Alligator® Plastic Rivet non-metallic fasteners from Flexco.
- Belt too hard for points to easily penetrate. Use stronger hook, i.e. hooks made of a high tensile wire or hooks made of a larger wire diameter. Heat belt slightly with warm water or a heat gun; or install fasteners with a Pro 6000 Lacer which warms the hooks and belt during the installation process.
- Lacing too close to edge of belt. Leave 1/4" to 1/2" (6mm - 13mm) unlaced on both sides of the belt. Chamfer/notch the trailing edges of the splice (notch both ends if belt is bi-directional). Install one more hook on the leading end than the trailing end of the belt to protect the end hooks from catching on conveyor components when in operation.
- Belt wave. When carded fasteners are installed into some belts the displaced material can cause the belt to ripple. Unibar® hooks have a welded common bar connecting each individual hook. The common bar keeps belt ends flat, which eases meshing and pin insertion.
- Consider using notched steel or stainless steel pins. If using a nylon coated solid core pin, such as Nylosteel, strip the last 1/2" (13mm) off from the pin and bend back, forming a 'J' end. The 'J' end can then lock into the splice.
- Consider using Unibar® hooks. Each hook leg is welded to a common bar, keeping the hook legs parallel during the installation process.
- Pin is too short and has allowed the splice to snap on obstructions. Replace pin.